官网:http://www.airspayce.com/mikem/bcm2835/index.html
注意事项:
1.
In order for bcm2835 library SPI to work, you may need to disable the SPI kernel module using:
Since bcm2835 accesses the lowest level hardware interfaces (in eh intererests of speed and flexibility) there can be intercations with other low level software trying to do similar things.
2.Real Time performance constraints
The bcm2835 is a library for user programs (i.e. they run in 'userland'). Such programs are not part of the kernel and are usually subject to paging and swapping by the kernel while it does other things besides running your program. This means that you should not expect to get real-time performance or real-time timing constraints from such programs. In particular, there is no guarantee that the bcm2835_delay() and bcm2835_delayMicroseconds() will return after exactly the time requested. In fact, depending on other activity on the host, IO etc, you might get significantly longer delay times than the one you asked for. So please dont expect to get exactly the time delay you request.
Arjan reports that you can prevent swapping on Linux with the following code fragment:
一、前言
本文是树莓派外围io操作的入门介绍,高手跳过。
前一篇介绍了BCM2835库的init部分,这里接着介绍一下BCM2835的SPI. SPI在BCM2835库文件中有两个相关的文件,一个是spi.c和spin. c; spin.c是多字节连续发送接收的demo。Spin.c是单字节发送的demo。这里主要讲一下spin.c。
BCM2835库的主要代码实现都目录下面的bcm2835.c这个文件里面。Spi部分相关的代码接口一共有11个,分别是:
int bcm2835_spi_begin(void); //
void bcm2835_spi_end(void);
void bcm2835_spi_setBitOrder(uint8_t order);
void bcm2835_spi_setBitOrder(uint8_t order);
void bcm2835_spi_setClockDivider(uint16_t divider);
void bcm2835_spi_setDataMode(uint8_t mode);
void bcm2835_spi_chipSelect(uint8_t cs);
void bcm2835_spi_setChipSelectPolarity(uint8_t cs, uint8_t active);
uint8_t bcm2835_spi_transfer(uint8_t value);
void bcm2835_spi_transfernb(char* tbuf, char* rbuf, uint32_t len);
void bcm2835_spi_transfern(char* buf, uint32_t len);
void bcm2835_spi_writenb(char* buf, uint32_t len);
二、代码分析
下面主要来分析一下spin.c里面的main函数及其所调用的接口函数
int main(int argc, char **argv)
{
if (!bcm2835_init())//所有外围io引脚初始化,之前已经分析过了
{
printf("bcm2835_init failed. Are you running as root??\n");
return 1;
}
/*spi相关的功能引脚初始化,主要的是将spi对应的io设置成spi功能,将CS寄存器清0,
清spi TX和RX的接收发送缓存。
*/
if (!bcm2835_spi_begin()) {
printf("bcm2835_spi_begin failed. Are you running as root??\n");
return 1;
}
bcm2835_spi_begin();
bcm2835_spi_setBitOrder(BCM2835_SPI_BIT_ORDER_MSBFIRST); // The default
/*将SPI的数据通信模式设置为模式BCM2835_SPI_MODE0,即CPOL = 0, CPHA = 0
CPOL = 0通信空闲状态时时钟线为高电平,CPHA = 0第二个时钟边沿采样数据。
*/
bcm2835_spi_setDataMode(BCM2835_SPI_MODE0); // The default
// 时钟分频
bcm2835_spi_setClockDivider(BCM2835_SPI_CLOCK_DIVIDER_65536);
//拉低片选引脚
bcm2835_spi_chipSelect(BCM2835_SPI_CS0);
bcm2835_spi_setChipSelectPolarity(BCM2835_SPI_CS0, LOW); // the default
char buf[] = { 0x01, 0x02, 0x11, 0x33 }; // Data to send
bcm2835_spi_transfern(buf, sizeof(buf));//数据发送和接收
// buf will now be filled with the data that was read from the slave
printf("Read from SPI: %02X %02X %02X %02X \n", buf[0], buf[1], buf[2], buf[3]);
bcm2835_spi_end();
bcm2835_close();
return 0;
}
bcm2835_spi_transfern是通过调用bcm2835_spi_transfernb来完成数据的发送的。
void bcm2835_spi_transfernb(char* tbuf, char* rbuf, uint32_t len)
{
volatile uint32_t* paddr = bcm2835_spi0 + BCM2835_SPI0_CS/4;
volatile uint32_t* fifo = bcm2835_spi0 + BCM2835_SPI0_FIFO/4;
uint32_t TXCnt=0;
uint32_t RXCnt=0;
/* Clear TX and RX fifos */
bcm2835_peri_set_bits(paddr, BCM2835_SPI0_CS_CLEAR, BCM2835_SPI0_CS_CLEAR);
/* Set TA = 1,设置TA将SPI恢复到未通信状态 */
bcm2835_peri_set_bits(paddr, BCM2835_SPI0_CS_TA, BCM2835_SPI0_CS_TA);
/* Use the FIFO's to reduce the interbyte times */
while((TXCnt < len)||(RXCnt < len))//发送和接收循环
{
/* TX fifo not full, so add some more bytes */
while(((bcm2835_peri_read(paddr) & BCM2835_SPI0_CS_TXD))&&(TXCnt < len ))
{
bcm2835_peri_write_nb(fifo, tbuf[TXCnt]);
TXCnt++;
}
/* Rx fifo not empty, so get the next received bytes */
while(((bcm2835_peri_read(paddr) & BCM2835_SPI0_CS_RXD))&&( RXCnt < len ))
{
rbuf[RXCnt] = bcm2835_peri_read_nb(fifo);
RXCnt++;
}
}
/* Wait for DONE to be set */
//等待通信结束
while (!(bcm2835_peri_read_nb(paddr) & BCM2835_SPI0_CS_DONE))
;
/* Set TA = 0, and also set the barrier */
bcm2835_peri_set_bits(paddr, 0, BCM2835_SPI0_CS_TA);//设置TA位结束通信
}
三、实例效果

上图是用逻辑分析仪抓到的数据,channel1和channel2分别是MOSI和MISO,channel3是时钟信号,时钟模式为CPOL = 0, CPHA = 0。CS片选为channel4,通信时将其拉低使能SPI。
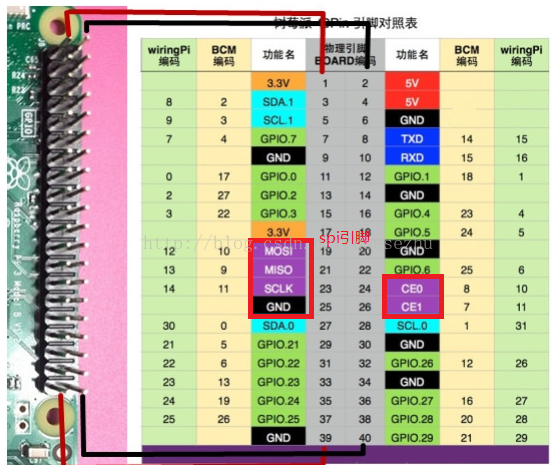
下图是树莓派3的外围IO图,左红色方框是spi的主要三个引脚,右边CE可不接,做loop是将MOSI和MISO互连,GDN和逻辑分析仪互连(最好相连,否则参考电平不同可能会出现解码错误)。

原文链接:https://blog.csdn.net/housezhu/article/details/77926641
*博客内容为网友个人发布,仅代表博主个人观点,如有侵权请联系工作人员删除。